-
Creating a Login UI Using Kivy Framework
-
Category : Python Development
-
Since graduating with my Master’s Degree in Computer Science this past December, I’ve found myself with an abundance of free time while I job hunt for my next adventure. So in order to keep my mind sharp and involved in programming and doing something beyond just hanging out with friends and watching TV, I’ve elected to spend a few hours a day furthering my programming knowledge. Recently the CAPE Program has been exploring different techniques to create a Client to interface with our Ground Station Radio Board that will communicate with our satellite using python. One of the frameworks the team came across was the Kivy Framework. While talking to the team, Kivy caught my eye due to it’s cross platform support on Linux, MAC OS, Android, Raspberry Pi and iOS, and natively allows touch actions and stylus pens to be used on the interface as easily as the traditional keyboard and mouse approach.
So to get a feel for this framework, I elected to implement a simple Login UI that takes in a username and password, and is verified by a server, and prints the results of the login on screen. The remainder of this article will walk you through the source code of my project. For those interested in a good resource to learn the Kivy Framework, I recommend watching the Kivy Tutorials posted on youtube by sentdex. Sentdex’s tutorial was where I began learning the framework, but in full disclosure, I rapidly found myself deviating from his videos by the 4th video given my goal was not to create a chatroom app, but a login app. To supplement what you don’t learn in the sentdex videos, I’d recommend checking out the online Kivy Documentation, its been a helpful resource.
Before continuing, I want to throw the following disclaimer out there. This article is meant to show the UI design process I went through. I am assuming you my reader have a general background in python already, and I will not be going over the code needed to send a HTTP Request using a REST API, as there are numerous resources out there that will probably do a much better job then I would. I am also assuming you have the Kivy framework installed on your machine, and it is working. Also for your reference, I’m developing in a Linux environment, on the Ubuntu Mate operating system. Without further ado, lets get started!
So in order to use the Kivy Framework, we need to import kivy, and import App from kivy.app. These are two general imports, every Kivy application will require in order to run. We will also need to have a kivy require to enforce the version of Kivy we’re using. You should take note of it during kivy installation.
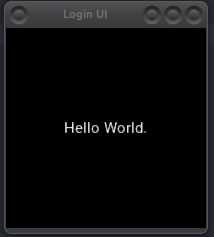
For the simplest UI in kivy, all that is needed is the creation of a class that will define and initialize the App. So as shown in the code block above, I created a class LoginUI that will inherit from class App from the Kivy library. Within the class, we’ll override the build function to include our UI designing, so in this case, I set the App title bar of the UI to be titled Login UI, and will have a single label to print “Hello World.”.
import kivy
from kivy.app import App
from kivy.uix.label import Label


kivy.require("1.10.1")

class LoginUI(App):
	def build(self):
		self.title = 'Login UI'
		return Label(text="Hello World.")

if __name__ == "__main__":
	LoginUI().run()
We will then run our class LoginUI in the main segment. When run, the screen produced by the code block will resemble the image below:
Now that the basics of creating a Hello World Kivy App are out of the way, lets get to the fun!In order for us to create an application with more then one label, we’ll want to create a class that inherits a layout from kivy. For the purpose of this tutorial, we’ll be selecting the gridlayout layout of Kivy, as at least to me its the easiest to work with. So lets import a few new items from kivy.uix, first the gridlayout, a TextInput, which we will use to get our user input to login, a Button for the obvious button to click to login, and popup to give us a popup result of our login attempt. We’ll also import Window from kivy.core.window to define the window sizing.
from kivy.uix.gridlayout import GridLayout
from kivy.uix.textinput import TextInput
from kivy.core.window import Window
from kivy.uix.button import Button
from kivy.uix.popup import Popup
To create a GridLayout screen in kivy, we will need to modify our LoginUI function to return an instance of a class inheriting the gridlayout, and add in our username, password and login button objects. To create the static UI for the login, first we must create a init function, that runs the init function of the superclass Grid System to initialize the layout. When creating a gridlayout, its important to think of each object added to the screen as inhabiting it’s own grid position like in a table. If you are familiar with bootstrap, it is identical to the GridLayout there or materialUI. So a 1 column grid layout, may have multiple rows of objects going down a page, while in a 2 column grid layout, we will have the two objects in the same row going down a screen. For this project, we’ll restrict ourselves to 1 column in the grid. However you can easily opt to have 2 columns and achieve similar results for the login UI. Next we’ll want to define the size of this window using Window.size = (500,300) where the numbers are (width, height) in pixels.
With the basic screen configurations set, we can begin adding objects, better known as widgets in kivy to the screen. Normally when we create labels, we don’t need to set it equal to a variable, as labels aren’t really changed often, however they can be. However in this project, all of my labels will be just automatically added to the screen, and my TextInputs and buttons, I’ll create a class member to access the object. So for example,
self.add_widget(Label(text="Login UI Example"))
We’ll also add a new label with the text “Login UI Example”:
self.add_widget(Label(text="Username: "))
self.username = TextInput(multiline=False,write_tab=False)
self.username.focus=True
self.add_widget(self.username)
This will create a member of class login, called username that holds the TextInput object for the username field of the screen. We’ll additionally set the multiline option to False, as we won’t want this field to increase in the number of lines, or contain a newline or carriage return character, as that makes no sense for a username and write_tabs to False to indicate any tabbing in this field will bring the cursor to the next field in the application. We will then set the username.focus to True, so a cursor appears on the user field to allow a user to type immediately without clicking at startup. Once created, we’ll add self.username to the add_widget function to add to screen.
Additionally, when creating the password field, we’ll set the password paramater to True, so the password doesn’t show up, and basically replicate everything else from username.
self.add_widget(Label(text="Password: "))
self.password = TextInput(multiline=False,write_tab=False, password=True)
self.add_widget(self.password)
Finally to create a button, we’ll add the following code:
self.connect = Button(text ="Login")

self.connect.bind(on_press=self.loginBtn)

self.add_widget(self.connect)
In this case, we’re creating a button with text “Login”, and then binding a function called self.loginBtn for when the button is pressed. We’ll get to the implementation of the login button next.
Pulling everything together, our init function will look like below:
class Login(GridLayout):
	def __init__(self,**kwargs):
		super().__init__(**kwargs)
		self.cols = 1
		Window.size = (500, 300)
		self.add_widget(Label(text="Login UI Example"))
		self.add_widget(Label(text="Username: "))
		self.username = TextInput(multiline=False,write_tab=False)
		self.username.focus=True
		self.add_widget(self.username)
		self.add_widget(Label(text="Password: "))
		self.password = TextInput(multiline=False,write_tab=False, password=True)
		self.add_widget(self.password)


		self.connect = Button(text ="Login")
		self.connect.bind(on_press=self.loginBtn)
		self.add_widget(self.connect)
Also remember, we need to adjust the return statement of LoginUI() to return Login() instead of the label to display our new UI, as shown below.
class LoginUI(App):
	def build(self):
		self.title = 'Login UI'

		return Login()
Next lets create our loginBtn function. As mentioned earlier this tutorial will not go into the actual implementation of sending the username and password to a endpoint on a server, as there are many guides out there, that will do better then what I can do. But I will show you how to create a function that prints username and password to terminal. As seen in the code below:
def loginBtn(self, instance):
	#print username / password to verify it works
	print(f"{self.username.text}" +","+ f"{self.password.text}")
Adding this to the Login class as a function, when running the program, we’ll get an output to our terminal with username and password.
Before we go ahead and run this program, lets add one last piece to this puzzle, because with the code we’ve already written, you can tab between username and password, but you can’t press enter and login, due to the button not being binded to the enter key, you have to actually move your mouse and click the button, which gets annoying after a while. So I also added code to allow pressing enter to attempt a login.
First in the init function, we will want to add the following line at the end of the function:
Window.bind(on_key_down=self.on_keyboard_down)
Secondly, we’ll want to add a function that overloads the Window key_keyboard_down function, to detect when a key is pressed, and implement logic to run when pressed. So in this case, we’re looking to monitor keycode 36 that correlates to the enter key. Please note, the kivy documentation on this was wrong for me, when I tried the values given, but through some trial and error, I found 36 works for me.
def on_keyboard_down(self, instance, keyboard, keycode, text, modifiers):
	if keycode == 36:  # 40 - Enter key pressed

		self.loginBtn(instance)
Note: To further elaborate on the keycode discrepancy, on my personal development computer, keycode 40 did not work for me, and instead 36 was mapped to the enter key. However, if 36 and 40 both don’t correlate to the enter key try the following to print your keycode for the enter key to replace in the if statement.
def on_keyboard_down(self, instance, keyboard, keycode, text, modifiers):

	print(keycode)
	if keycode == 36:  # 40 - keycode recommended in kivy documentation

		self.loginBtn(instance)
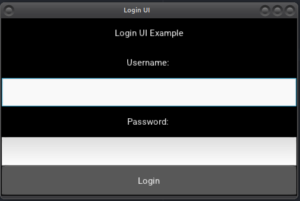
Now when we pull all of this together, we should get a screen that looks like this, depending on how you set your columns earlier:
Lastly, before concluding this tutorial, I’ll also give you a nice function to create a popup on screen to give a login result. This function will popup a screen using the BoxLayout, and will create a screen with a title and display a message, and an “ok” button. This function lets you pass in the title of the popup, and result message to display in box for you.
First, lets import a BoxLayout for use in making the popup!
from kivy.uix.boxlayout import BoxLayout
and now, here is the Create Popup function:
	def createPopUp(self,title,msg):
		box = BoxLayout(orientation = 'vertical', padding = (10))
		box.add_widget(Label(text = msg))
		btn1 = Button(text = "Ok")

		box.add_widget(btn1)


		popup = Popup(title=title, title_size= (30),title_align = 'center', content = box,size_hint=(None, None), size=(430, 200), auto_dismiss = True)

		btn1.bind(on_press = popup.dismiss)
		popup.open()
Below is an example of code to use the createPopUp function:
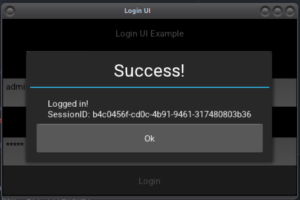
self.createPopUp("Success","Logged In!")Note that I’d recommend changing the size of the popup to match the size of your UI just in case the two sizes are incompatible. Below is a screenshot of that popup in action, I displayed “Success!” for the title and the message “Logged in!” followed by the session ID for the server i’m testing with for debug reasons. Don’t worry about the SessionID in the above example of usage for the Popup, I included that as a second line in the msg parameter.
With that this has been my tutorial for creating a simple Login UI using The Kivy Framework in Python. If you have questions or comments, please feel free to leave them below, and I’ll respond when I can!Thanks and happy coding!
Edit Feb. 25th, 2020: Here is a link to the completed code on my personal github page of everything covered in this tutorial:
Link: https://github.com/cmd-drake/Kivy-Framework-Login-UI
-
Leave a Comment
-
comments
Nice exploration
Thanks Hiro!